We have been getting some good feedback recently on the radanalytics.io project, and one topic that has been on my mind for some time now is support for Python 3. As I hope you know, Python 2 is moving ever closer to deprecation. I think for most Python fans this is seen as a good thing (TM), and getting all that Python 2 legacy stuff up to date is no small task.
To that end, we are working to enable Python 3 as a first class citizen in our Apache Spark clusters and source-to-image builders. I have created a few experimental images to demonstrate this capability and I am sharing here a workflow for all the eager alpha testers out there.
Please note, this work is evolving and these instructions are ALPHA version!!!
The sources
For starters, we have 2 image sources that I have assembled to support the Python 3 work; an image for the cluster, and an image for the builder.
Cluster image lives here: docker.io/elmiko/openshift-spark:python36-latest
with the source residing at github.com/elmiko/openshift-spark/tree/python36
Builder image lives here: docker.io/elmiko/radanalytics-pyspark:python36-latest
with the source residing at github.com/elmiko/oshinko-s2i/tree/python36
Both of these repositories use the concreate tool
for building the images. I won’t discuss how to do that here, but look at the
Makefile and related scripts in each repo for more information.
Using the images
Now the fun part, how to start using these images to create Python 3 Apache Spark applications on OpenShift.
For now, I have only tested the workflow where a user will deploy a Spark cluster manually. I will be adding support for automatic clusters but that will take a little longer to implement with testing and whatnot.
Step 1. launch a cluster
To launch a cluster with my custom image, I will use the oshinko cli tool. You can find binary releases here.
oshinko create spy3 --image=elmiko/openshift-spark:python36-latest --masters=1 --workers=1
This will create a cluster named spy3 with 1 master and 1 worker.
Step 2. Setup the builder template for my application
Next I want to launch an application against the cluster. For this I will use our very basic Pi tutorial code.
To make this work properly though, i need to change my source-to-image template that I use for building the application. The following template is what I want:
apiVersion: v1
kind: Template
labels:
  application: oshinko-python-spark
  createdBy: template-oshinko-python36-spark-build-dc
metadata:
  annotations:
    description: Create a buildconfig, imagestream and deploymentconfig using source-to-image and Python Spark source files hosted in git
    openshift.io/display-name: Apache Spark Python
  name: oshinko-python36-spark-build-dc
objects:
- apiVersion: v1
  kind: ImageStream
  metadata:
    name: ${APPLICATION_NAME}
    labels:
      app: ${APPLICATION_NAME}
  spec:
    dockerImageRepository: ${APPLICATION_NAME}
    tags:
    - name: latest
- apiVersion: v1
  kind: BuildConfig
  metadata:
    name: ${APPLICATION_NAME}
    labels:
      app: ${APPLICATION_NAME}
  spec:
    output:
      to:
        kind: ImageStreamTag
        name: ${APPLICATION_NAME}:latest
    source:
      contextDir: ${CONTEXT_DIR}
      git:
        ref: ${GIT_REF}
        uri: ${GIT_URI}
      type: Git
    strategy:
      sourceStrategy:
        env:
        - name: APP_FILE
          value: ${APP_FILE}
        forcePull: true
        from:
          kind: DockerImage
          name: elmiko/radanalytics-pyspark:python36-latest
      type: Source
    triggers:
    - imageChange: {}
      type: ImageChange
    - type: ConfigChange
    - github:
        secret: ${APPLICATION_NAME}
      type: GitHub
    - generic:
        secret: ${APPLICATION_NAME}
      type: Generic
- apiVersion: v1
  kind: DeploymentConfig
  metadata:
    name: ${APPLICATION_NAME}
    labels:
      deploymentConfig: ${APPLICATION_NAME}
      app: ${APPLICATION_NAME}
  spec:
    replicas: 1
    selector:
      deploymentConfig: ${APPLICATION_NAME}
    strategy:
      type: Rolling
    template:
      metadata:
        labels:
          deploymentConfig: ${APPLICATION_NAME}
          app: ${APPLICATION_NAME}
      spec:
        containers:
        - env:
          - name: DRIVER_HOST
            value: ${APPLICATION_NAME}-headless
          - name: OSHINKO_CLUSTER_NAME
            value: ${OSHINKO_CLUSTER_NAME}
          - name: APP_ARGS
            value: ${APP_ARGS}
          - name: SPARK_OPTIONS
            value: ${SPARK_OPTIONS}
          - name: OSHINKO_DEL_CLUSTER
            value: ${OSHINKO_DEL_CLUSTER}
          - name: APP_EXIT
            value: "true"
          - name: OSHINKO_NAMED_CONFIG
            value: ${OSHINKO_NAMED_CONFIG}
          - name: OSHINKO_SPARK_DRIVER_CONFIG
            value: ${OSHINKO_SPARK_DRIVER_CONFIG}
          - name: POD_NAME
            valueFrom:
              fieldRef:
                fieldPath: metadata.name
          image: ${APPLICATION_NAME}
          imagePullPolicy: IfNotPresent
          name: ${APPLICATION_NAME}
          resources: {}
          terminationMessagePath: /dev/termination-log
          volumeMounts:
          - mountPath: /etc/podinfo
            name: podinfo
            readOnly: false
        dnsPolicy: ClusterFirst
        restartPolicy: Always
        serviceAccount: oshinko
        volumes:
        - downwardAPI:
            items:
            - fieldRef:
                fieldPath: metadata.labels
              path: labels
          name: podinfo
    triggers:
    - imageChangeParams:
        automatic: true
        containerNames:
          - ${APPLICATION_NAME}
        from:
          kind: ImageStreamTag
          name: ${APPLICATION_NAME}:latest
      type: ImageChange
    - type: ConfigChange
- apiVersion: v1
  kind: Service
  metadata:
    name: ${APPLICATION_NAME}
    labels:
      app: ${APPLICATION_NAME}
  spec:
    ports:
    - name: 8080-tcp
      port: 8080
      protocol: TCP
      targetPort: 8080
    selector:
      deploymentConfig: ${APPLICATION_NAME}
- apiVersion: v1
  kind: Service
  metadata:
    name: ${APPLICATION_NAME}-headless
    labels:
      app: ${APPLICATION_NAME}
  spec:
    clusterIP: None
    ports:
    - name: driver-rpc-port
      port: 7078
      protocol: TCP
      targetPort: 7078
    - name: blockmanager
      port: 7079
      protocol: TCP
      targetPort: 7079
    selector:
      deploymentConfig: ${APPLICATION_NAME}
parameters:
- description: 'The name to use for the buildconfig, imagestream and deployment components'
  from: 'python-spark-[a-z0-9]{4}'
  generate: expression
  name: APPLICATION_NAME
  required: true
- description: The URL of the repository with your application source code
  displayName: Git Repository URL
  name: GIT_URI
- description: Optional branch, tag or commit
  displayName: Git Reference
  name: GIT_REF
- description: Git sub-directory path
  name: CONTEXT_DIR
- description: The name of the main py file to run. If this is not specified and there is a single py file at top level of the git respository, that file will be chosen.
  name: APP_FILE
- description: Command line arguments to pass to the Spark application
  name: APP_ARGS
- description: List of additional Spark options to pass to spark-submit (for exmaple --conf property=value --conf property=value). Note, --master and --class are set by the launcher and should not be set here
  name: SPARK_OPTIONS
- description: The name of the Spark cluster to run against. The cluster will be created if it does not exist, and a random cluster name will be chosen if this value is left blank.
  name: OSHINKO_CLUSTER_NAME
- description: The name of a stored cluster configuration to use if a cluster is created, default is 'default'.
  name: OSHINKO_NAMED_CONFIG
- description: The name of a configmap to use for the Spark configuration of the driver. If this configmap is empty the default Spark configuration will be used.
  name: OSHINKO_SPARK_DRIVER_CONFIG
- description: If a cluster is created on-demand, delete the cluster when the application finishes if this option is set to 'true'
  name: OSHINKO_DEL_CLUSTER
  required: true
  value: 'true'
You can deploy this template quickly by using this command:
oc create -f https://gist.githubusercontent.com/elmiko/64338bcf36bdbc19de63330dafd5c706/raw/4f01dbcfa90e89f9567fb67ed8128e37dfc2d476/oshinko-python36-spark-build-dc.yaml
Step 3. Launch the application
With everything in place, I am now ready to launch my application. I will use the previously create Spark cluster and my custom template. The following command will build and deploy my sparkpi:
oc new-app --template oshinko-python36-spark-build-dc \
  -p APPLICATION_NAME=sparkpi \
  -p GIT_URI=https://github.com/elmiko/tutorial-sparkpi-python-flask.git \
  -p GIT_REF=python3 \
  -p OSHINKO_CLUSTER_NAME=spy3
I also need to expose a route to my app:
oc expose svc/sparkpi
With all this in place, I can now make a curl request to my application and confirm an approximation of Pi:
$ curl http://`oc get routes/sparkpi --template='{{.spec.host}}'`/sparkpi
Pi is roughly 3.14388
Confirming Python 3 in the images
Much of this might look like magic, if you really want to confirm that Python 3 is in the images and is being used there are a couple options. You can inject some code into your application that will print the Python version, for example:
import sysconfig
print(sysconfig.get_python_version())
On the driver you can use the terminal option in OpenShift to login and run the Python REPL. You should see something like this:
$ oc rsh dc/sparkpi
(app-root) sh-4.2$ python
Python 3.6.3 (default, Mar 20 2018, 13:50:41)
[GCC 4.8.5 20150623 (Red Hat 4.8.5-16)] on linux
Type "help", "copyright", "credits" or "license" for more information.
>>>
For the Spark master and worker nodes it’s a little more complicated as they will use the software collections enablement commands to invoke the Python REPL, as follows:
$ oc rsh dc/spy3-m
sh-4.2$ scl enable rh-python36 python
Python 3.6.3 (default, Mar 20 2018, 13:50:41)
[GCC 4.8.5 20150623 (Red Hat 4.8.5-16)] on linux
Type "help", "copyright", "credits" or "license" for more information.
>>>
Hopefully this will be enough to satisfy your curiousity. =)
Bonus: Jupyter notebook connecting to an Oshinko cluster with Python 3
As another small experiment, I have been working to get a Jupyter notebook connected to a Spark cluster spawned by Oshinko with a Python 3 cluster.
I have created a custom image to help this work proceed, you will find the
image here: docker.io/elmiko/jupyter-notebook-py36
With the corresponding code here github.com/elmiko/jupyter-notebook-py36
To make this work, you will need to deploy a cluster as indicated above, and then craft your initial notebook cells to utilize the cluster. This is all quite rough currently, but I expect the tooling will become more smooth over time.
Step 1. Launch the notebook
Launch the notebook image by running the following command:
oc new-app elmiko/jupyter-notebook-py36 \
  -e JUPYTER_NOTEBOOK_PASSWORD=foo \
  -e PYSPARK_PYTHON=/opt/rh/rh-python36/root/usr/bin/python
Then expose a route to your notebook:
oc expose svc/jupyter-notebook-py36
Step 2. Attach to a running cluster
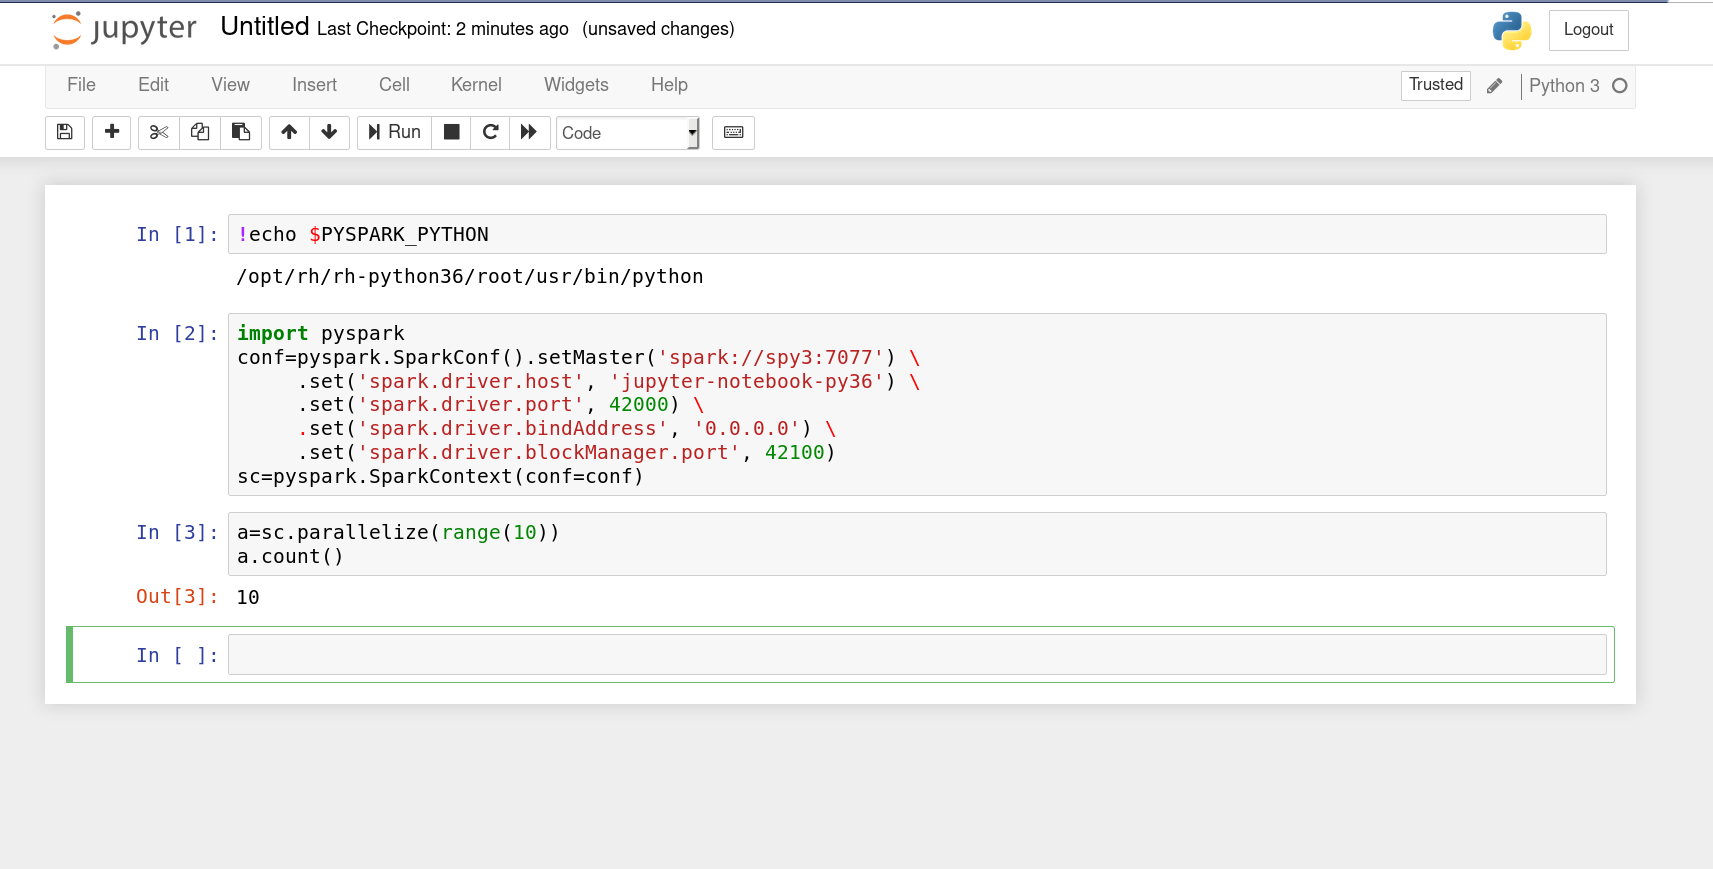
To attach the notebook to a running Spark cluster you need to do a little setup on your Spark context. The following code should be used in your first cell to setup this interaction, note these values are higly specific to this image and deployment:
import pyspark
conf=pyspark.SparkConf().setMaster('spark://spy3:7077') \
     .set('spark.driver.host', 'jupyter-notebook-py36') \
     .set('spark.driver.port', 42000) \
     .set('spark.driver.bindAddress', '0.0.0.0') \
     .set('spark.driver.blockManager.port', 42100)
sc=pyspark.SparkContext(conf=conf)
This image shows a view of what it should look like.
Closing thoughts
This work is all evolving at a quick rate, but I sincerely hope we will start to land Python 3 support next week with more enhancements to follow. The radanalytics.io project is all about making it easier for developers to do machine learning and analytics work on OpenShift. Hopefully, these changes will move us forward in that direction.
As always, happy hacking!